Showing posts with label weaving. Show all posts

Friday, October 14, 2016

Creative Weaving Ideas

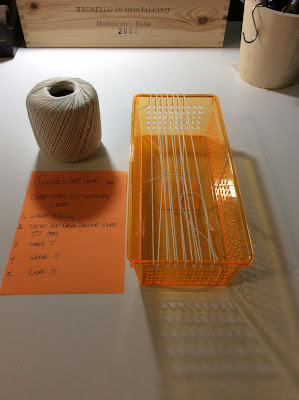
The Dollar Tree, portable, weaving loom idea for the creative soul on the go :)

I am always looking out for different objects to weave on. I don't know why I started doing this, but it is so much fun for me, and it will make me really happy to share my ideas with you so that you can try them too!


1. Warp it 2. Weave it 3. Love it

This first weaving loom idea can be started with a quick trip to a Dollar Tree store to pick up one of these handy dandy plastic bins. If you are like me, you already have at leave a hundred. I use them to sort floss, pens, markers, and other craft related items for me and my 3 year old daughter. They are very useful. I even use them in the kitchen for organizing snacks in the cabinets and in the utensil drawer. 


I tested the process going completely around the bin with the warp string, and through the existing holes. For me, the holes worked much better.  


Next, I just wanted to see what was possible... so I did a few different test squares for fun.  I did a combination of both hand knotting techniques and weaving techniques. I think some of the combinations looks beautiful together and will make lovely pieces of hand made, hand woven, hand knotted jewelry.

Top square: hand knotting technique - alpha style knotting

The best part about this particular loom idea is that you can toss all of your supplies into the bin, warped and all... and take it in the car, on vacation, to the doctors office... wherever you go, you can have a loom with you so you never have to stop creating. 

If you give this idea a try... I would love to see what you have come up with.  Enjoy!

Sunday, April 17, 2016

Spring Weaving

i just wanted to share the item I just added to my front door. It is my first completed larger scale weaving. For me, it was a shape and fringe practicing piece. I thought it would be nice to hand on the door in lieu of a wreath for spring.


Friday, April 8, 2016

The Four Knots of Micro Macrame or Friendship Bracelets

When I first starting knotting, I found it very difficult to get my knots to look good. Unless you were born to knot, you will take some time to get really good results. It takes practice... a lot of it... but if you enjoy knotting, you won't mind. I didn't - I don't! I am always practicing.

I wanted to get good, so I went searching for every tutorial I could find. No one can tell you how to make a good knot. I cannot stress it enough. It takes trial and error... wasting a ton of string or other media.. it is going to happen. At one point, I'm sure more floss went into the trash than into a final piece.

Don't over complicate! You have been making knots your entire life. You are already an expert!

As we know, there are two styles of hand knotting.  There are "Normal" patterns, and "Alpha" or "alphabet" patterns.  Normal patterns, which we will be learning shortly, uses 4 types of knots. The forward knot, backward knot, backward-forward knot, and forward-backward knot. The alpha patterns only use two knots, the forward and the backward knots.

Before you can start, you should be able to read the knotting symbols. This will help you understand and follow the patterns.


1. Forward Knot
2. Backward Knot
3. Backward-Forward Knot
4. Forward-Backward Knot

Above is my trusty note card. You are welcome to print or copy it for your personal use. 

Beginning Knot Tying Tips:

  • As you can see from my sketch - each knot is actually made up of (2) two knots. If you don't make two knots... you will not achieve the results you are looking for. 

  • Think of it as though the first knot is the lock, but the second knot is the chain! It is locking the knot in place.

  • Start practicing the four knots and learning how to read the knotting symbols and patterns. Check out BraceletBook.com and Friendship-Bracelets.net to see tons of examples of patterns. 
  • Great starter patterns include the candy stripe, and the chevron. I will go into detail on all of this in future posts. In the meantime, if you have any questions, please get in touch. 


Friday, March 25, 2016

Weaving in progress

This is a photo of the weaving I'm working on now. I've just started working on the "M" for my daughter Madeline. I'm using colors she loves... They are really vibrant. I'm having fun with this one... It's a shape sampler.


Sunday, February 28, 2016

Welcome to Jennifer's Knot Home!


And so it begins, a digital account of my creative escapades. It all started for me a couple of years ago. After I had my daughter, I was trying to come up with ways to express my creativity while being a stay at home mom.

I somehow stumbled across a friendship bracelet pattern, and lamented about how I was never able to do it when I was a kid. I was intrigued, however, and it seemed fun, and a good way to pass the time while baby was sleeping.

I visited my local Joann's Fabric and picked up some embroidery floss. My first several attempts were crap, and I was certain that I couldn't pull it off... Until I did. I started with the basic designs, the candy stripe and the chevron, neither of which required a pattern. After I mastered the basics, I was hungry for more.

This hunger meant that I'd have to teach myself how to read patterns. It seemed daunting, and I wasn't sure if I could do it... Then, I did. I started small, just a few strings, then I worked my way up to 20+ strings.  After time, I started getting bored of the normal patterns. I dug deeper and decided to teach myself how to read alpha charts. Alpha patterns are much different than normal patterns, but allow for much more detail.

I started adapting cross stitch, and other charts for knotting. The world opened up and I realized, this was my passion. I was having a love affair with string. I grappled with the idea that it was juvenile, and a waste of time, but I was getting good at it, and wanted to keep going.

It was at this time that I learned about weaving looms. I started my research, and decided I wanted to give it a go. I made my first loom out of cardboard... And I didn't like it. I saw the potential, but found it difficult on the cardboard. I wanted to succeed and start creating beautiful masterpieces made of fiber.

I finally invested in a loom... And wow... I was in love. It was much better than using the cardboard, and I took to it immediately. This is where I'm at right now. Here is where I invite you in, to share in my creative adventures. Join me, as I attempt to discover my own style and technique and create works of art made with string, yarn, and other fibers.

Along the way, I will share the resources I collected, offer tips and tricks that I discovered to make my life easier, and share my techniques through various tutorials and photos.  I will walk you through the basics, help you understand knots and the four types associated with hand knotting. I will share with you what floss I feel works best for me and why. I have a lot to share... So if you are ready. Here we go!

I am still on this journey, and don't know where it will take me next... But I decided having a digital account would not only benefit me, but others like me, trying to learn more and start their own creative journey.

Welcome to Jennifer's Knot Home.