Showing posts with label Knotting. Show all posts

Sunday, September 10, 2017

Morgan Freeman Tapestry - Free Chart


Mr. Freeman was the first man I ever hand knotted. It was a request by Christopher, but we both truly love the work of Mr. Freeman... so it was an easy request to fill.

I am offering the chart I created to make it - free to other fans that may want to use it. The chart can be used to make a tapestry, a blanket... whatever craft you are doing that involves a charted design. Enjoy

If you are a fan of Morgan Freeman, a couple a movies (off the beaten path) that you may not have seen, are 10 Items or Less (2006) - IMDb and 5 Flights Up (2014) - IMDb - I just love them both.

If you are looking for more things that are free - check out my other website - Creative Public - it is a compendium of resources to all kinds of things in the public domain.


Friday, October 14, 2016

Creative Weaving Ideas

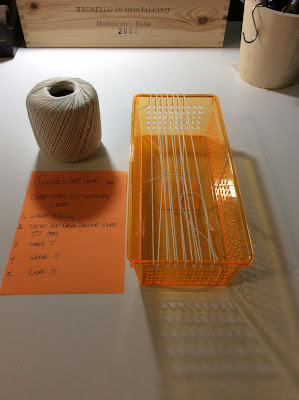
The Dollar Tree, portable, weaving loom idea for the creative soul on the go :)

I am always looking out for different objects to weave on. I don't know why I started doing this, but it is so much fun for me, and it will make me really happy to share my ideas with you so that you can try them too!


1. Warp it 2. Weave it 3. Love it

This first weaving loom idea can be started with a quick trip to a Dollar Tree store to pick up one of these handy dandy plastic bins. If you are like me, you already have at leave a hundred. I use them to sort floss, pens, markers, and other craft related items for me and my 3 year old daughter. They are very useful. I even use them in the kitchen for organizing snacks in the cabinets and in the utensil drawer. 


I tested the process going completely around the bin with the warp string, and through the existing holes. For me, the holes worked much better.  


Next, I just wanted to see what was possible... so I did a few different test squares for fun.  I did a combination of both hand knotting techniques and weaving techniques. I think some of the combinations looks beautiful together and will make lovely pieces of hand made, hand woven, hand knotted jewelry.

Top square: hand knotting technique - alpha style knotting

The best part about this particular loom idea is that you can toss all of your supplies into the bin, warped and all... and take it in the car, on vacation, to the doctors office... wherever you go, you can have a loom with you so you never have to stop creating. 

If you give this idea a try... I would love to see what you have come up with.  Enjoy!

Friday, April 8, 2016

The Four Knots of Micro Macrame or Friendship Bracelets

When I first starting knotting, I found it very difficult to get my knots to look good. Unless you were born to knot, you will take some time to get really good results. It takes practice... a lot of it... but if you enjoy knotting, you won't mind. I didn't - I don't! I am always practicing.

I wanted to get good, so I went searching for every tutorial I could find. No one can tell you how to make a good knot. I cannot stress it enough. It takes trial and error... wasting a ton of string or other media.. it is going to happen. At one point, I'm sure more floss went into the trash than into a final piece.

Don't over complicate! You have been making knots your entire life. You are already an expert!

As we know, there are two styles of hand knotting.  There are "Normal" patterns, and "Alpha" or "alphabet" patterns.  Normal patterns, which we will be learning shortly, uses 4 types of knots. The forward knot, backward knot, backward-forward knot, and forward-backward knot. The alpha patterns only use two knots, the forward and the backward knots.

Before you can start, you should be able to read the knotting symbols. This will help you understand and follow the patterns.


1. Forward Knot
2. Backward Knot
3. Backward-Forward Knot
4. Forward-Backward Knot

Above is my trusty note card. You are welcome to print or copy it for your personal use. 

Beginning Knot Tying Tips:

  • As you can see from my sketch - each knot is actually made up of (2) two knots. If you don't make two knots... you will not achieve the results you are looking for. 

  • Think of it as though the first knot is the lock, but the second knot is the chain! It is locking the knot in place.

  • Start practicing the four knots and learning how to read the knotting symbols and patterns. Check out BraceletBook.com and Friendship-Bracelets.net to see tons of examples of patterns. 
  • Great starter patterns include the candy stripe, and the chevron. I will go into detail on all of this in future posts. In the meantime, if you have any questions, please get in touch.